當桌⾯應⽤程式需要網路資源時,可以⽤ HttpClient 或 WebClient 等發送 HTTP 請求,但有時反過來想要開放桌⾯程式的資源供外界使⽤呢?這時就可以⽤ Self Host 的⽅式,不需要依附 IIS 就可以在程式裡掛載 Web API,為程式和外界聯繫提供⼀個管道。
本篇是記錄在 Console 程式中如何使⽤ Microsoft.AspNet.WebApi.OwinSelfHost 建置 Web API,包含使⽤ HTTPS 網址、繫結多個 IP 或域名、啟⽤ CORS 等,最後補充了管理 SSL 憑證相關指令與 Windows Service 中啟動 Web API 的程式碼。
一、系統環境
- Windows 10
- Visual Studio 2019
- .NET Framework 4.7.2
⼆、建立 Startup.cs,Web API 的進入點
⾸先,安裝套件:
Install-Package Microsoft.AspNet.WebApi.OwinSelfHost -Version 5.2.7
(OWIN 為 .NET Framework 4.5 以上使⽤, 4.0 ⽤ Microsoft.AspNet.WebApi.SelfHost 裝載 Web API)
接著新增類別(或 OWIN 啟動類別)Startup.cs,設定路由規則,讓 Web API 以此規則在 OWIN 上運⾏。
 1
 2
 3
 4
 5
 6
 7
 8
 9
10
11
12
13
14
15
16
17
18
19
20
21
22
23
24
25
26
| using System.Web.Http;
//using System.Web.Http.Cors;
using Microsoft.Owin;
using Owin;
[assembly: OwinStartup(typeof(SelfHostConsole.Startup))]
namespace SelfHostConsole
{
public class Startup
{
public void Configuration(IAppBuilder app)
{
// 如需如何設定應用程式的詳細資訊,請瀏覽 https://go.microsoft.com/fwlink/?LinkID=316888
// Configure Web API for self-host.
HttpConfiguration config = new HttpConfiguration();
config.Routes.MapHttpRoute(
name: "DefaultApi",
routeTemplate: "api/{controller}/{id}",
defaults: new { id = RouteParameter.Optional }
);
//Enable CORS
//config.EnableCors(new EnableCorsAttribute("*", headers: "*", methods: "*"));
app.UseWebApi(config);
}
}
}
|
如果網站需要跨域資源共享(CORS),則需安裝 CORS 套件,並啟用上述第 2 和 22 ⾏:
Install-Package Microsoft.AspNet.WebApi.Cors -Version 5.2.7
接下來在 Program.cs 裡設定執⾏程式時啟動 Web API host:
 1
 2
 3
 4
 5
 6
 7
 8
 9
10
11
12
13
14
15
16
17
18
19
| using Microsoft.Owin.Hosting;
using System;
namespace SelfHostConsole
{
class Program
{
static void Main(string[] args)
{
string baseAddress = "http://localhost:55000/";
Console.WriteLine("Start OWIN host ...");
using (WebApp.Start<Startup>(url: baseAddress))
{
Console.WriteLine("Wait for a request ...");
Console.ReadLine();
}
}
}
}
|
此時若以 Postman 測試 Get 訪問 http://localhost:55000/ 會收到 404 Not Found,⽽不是出現 Error: connect ECONNREFUSED 127.0.0.1:55000 這樣的訊息,表⽰這時候 Web API 的基本架構已經完成了。
三、加入 Controller
依照習慣取代配置(Convention over Configuration)的原則,Controller 以 Controller 結尾就可以被找到,這邊簡單加個 TestController。
 1
 2
 3
 4
 5
 6
 7
 8
 9
10
11
12
13
14
15
16
17
18
19
20
21
22
23
24
25
26
27
28
29
30
31
32
33
34
35
36
37
38
39
40
41
| using System.Collections.Generic;
using System.Web.Http;
namespace SelfHostConsole
{
public class TestController : ApiController
{
private static List<MyModel> list = new List<MyModel>()
{
new MyModel(){Name="name1", Value="value1"},
new MyModel(){Name="name2", Value="value2"},
};
// GET api/test
public IEnumerable<MyModel> Get()
{
return list;
}
// GET api/test/1
public MyModel Get(int id)
{
if (id < 0 || id >= list.Count)
return null;
return list[id];
}
// POST api/test
public IEnumerable<MyModel> Post([FromBody] MyModel newData)
{
list.Add(newData);
return list;
}
}
public class MyModel
{
public string Name { get; set; }
public string Value { get; set; }
}
}
|
這樣 Web API 就可以運作了。
⽤ Postman 測試⼀下,運作正常。

如果 Postman 收到以下的訊息,確認⼀下是否有將 Controller 設為 public class。
1
2
3
4
| {
"Message": "No HTTP resource was found that matches the request URI 'http://localhost:55000/api/test'.",
"MessageDetail": "No type was found that matches the controller named 'test'."
}
|
四、安裝 SSL 憑證,啟⽤ HTTPS
若要啟⽤ HTTPS,程式碼網址部分直接修改成 https 即可。除此之外環境要安裝 SSL 憑證。
1. 建立 SSL 憑證
這邊⽤ OpenSSL 建立憑證,取得 crt 和 pfx 檔後,匯入⾃簽憑證到「受信任的根憑證授權單位」和「伺服器憑證」。
以系統管理員⾝分執⾏命令提⽰字元,其中 CertPassword 取代為在建立 pfx 檔時所輸入的密碼。:
1
| certutil -f -p CertPassword -importpfx "server.pfx"
|
2. 取得憑證指紋(Thumbprint)
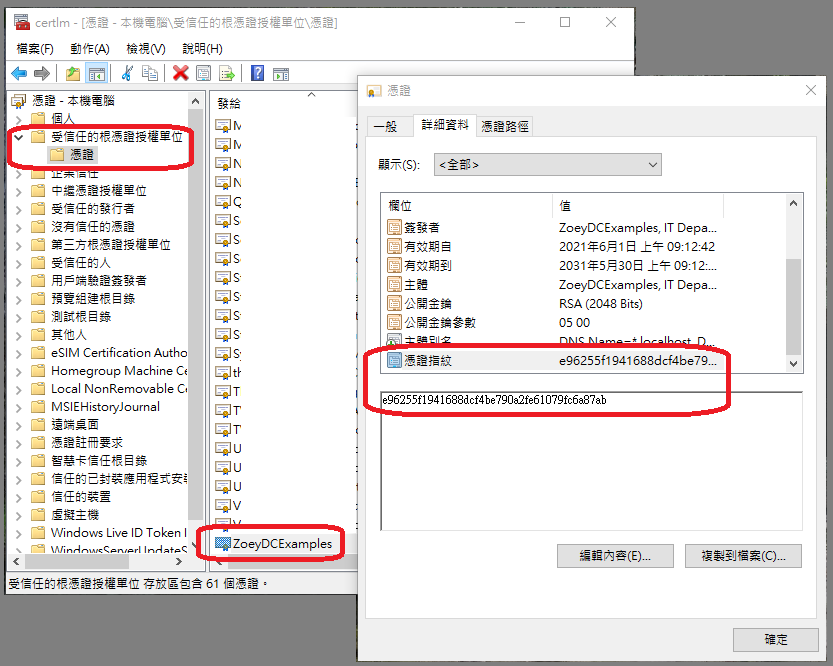
在「開始」功能表搜尋 mmc 或 certlm.msc ,進到憑證管理介⾯,在「個⼈」或「受信任的根憑證授權單位」中找到匯入的憑證名稱,快點兩下進到「詳細資料」畫⾯,將憑證指紋記錄下來。(也可⽤ openssl 取得憑證指紋)

3. 將 SSL 憑證和 Port 綁定
以系統管理員⾝分執⾏命令提⽰字元,其中 certhash 為上⼀步驟得到的憑證指紋,appid 則填入任意⼀組 GUID。:
1
| netsh http add sslcert ipport=0.0.0.0:55000 certhash=e96255f1941688dcf4be790a2fe61079fc6a87ab appid={bd59f744-97e7-4b9b-b100-9ab561e3bd5a}
|
4. 進⾏測試
Postman 測試時可能會出現 Error: self signed certificate,是因為憑證檢核時⾃簽憑證無法過關,需要在設定裡將「SSL certificate verification」關閉(建議測試完後恢復進⾏檢核)。正常來說可以得到和先前⼀樣的結果,除了網址 http 現在換成 https。
五、繫結多個 IP 或域名
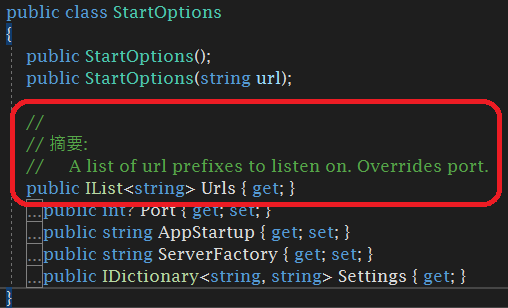
在 Program.cs 啟動 Web API 是使用 WebApp.Start(url: baseAddress) 來設定網址,觀察它的 Metadata,Start 方法除了傳入 url 網址外,還有另一個傳入 StartOptions 的多載,裡面有個 Urls 的 Property,說明為「A list of url prefixes to listen on. Overrides port.」,所以就是從這邊下手了。

 1
 2
 3
 4
 5
 6
 7
 8
 9
10
11
12
13
14
15
16
| class Program
{
static void Main(string[] args)
{
StartOptions options = new StartOptions();
options.Urls.Add("https://localhost:55000/");
options.Urls.Add("http://localhost:55001/");
Console.WriteLine("Start OWIN host ...");
using (WebApp.Start<Startup>(options: options))
{
Console.WriteLine("Wait for a request ...");
Console.ReadLine();
}
}
}
|
這樣就完成了多個 IP 的繫結。
補充
1. SSL 憑證安裝刪除查詢
參考「⽤ certutil 新增刪除查詢 SSL 憑證」。
2. SSL 繫結 Port 及刪除、查詢繫結
1
2
3
4
| netsh http add sslcert ipport=0.0.0.0:55000 certhash=e96255f1941688dcf4be790a2fe61079fc6a87ab appid={bd59f744-97e7-4b9b-b100-9ab561e3bd5a}
netsh http delete sslcert ipport=0.0.0.0:55000
netsh http show sslcert
netsh http show sslcert ipport=0.0.0.0:55000
|
3. 在 Windows Service 中啟動 Web API
覆寫 OnStart 與 OnStop 方法時分別建立和釋放 Web API 資源。
 1
 2
 3
 4
 5
 6
 7
 8
 9
10
11
12
13
14
15
16
17
18
19
20
21
22
23
24
25
26
27
28
29
| using Microsoft.Owin.Hosting;
using System;
using System.ServiceProcess;
namespace SelfHost
{
public partial class SelfHostService : ServiceBase
{
private IDisposable _server = null;
public SelfHostService()
{
InitializeComponent();
}
protected override void OnStart(string[] args)
{
_server = WebApp.Start<Startup>("https://localhost:55000/");
}
protected override void OnStop()
{
if (_server != null)
{
_server.Dispose();
}
base.OnStop();
}
}
}
|
相關連結:
- [Microsoft Docs] ⾃我裝載 ASP.NET Web API 1 (C#)
- [Microsoft Docs] 使⽤ OWIN ⾃我裝載 ASP.NET Web API
- [Microsoft Docs] 如何:使⽤ MMC 嵌入式管理單元來查看憑證
- [Microsoft Docs] 作法:使⽤ SSL 憑證設定連接埠
- [WILL保哥] 如何使⽤ OpenSSL 建立開發測試⽤途的⾃簽憑證 (Self-Signed Certificate)
- [⿊暗執⾏緒] PostMan 無法連線 IIS Express 網站
- OWIN WebAPI Service example


